
STEP 1 (INITIAL PAD SEATING)
So it is fine to do normal driving with normal braking to allow the pads to mate up to the disc and establish full contact. This method can take a while depending on your day to day driving. For those wanting to get their new brakes up to their optimum performance faster, we would suggest the following.
Under safe and controlled conditions, carry out 6 – 8 decelerations from 50 mph to 20 mph at around 50% pedal pressure application, with mild acceleration back up to speed between decelerations. After this, try and drive for 5 – 10 miles without using the brakes or as minimal as possible.
STEP 2 (HEAT CYCLING DISCS & PADS / CHEMICAL CURING OF ORGANIC COMPOUNDS)
Perform 8 – 10 decelerations from 60-20mph at around 70 – 80% pedal pressure application with quicker acceleration (not full) to get back up to speed and repeat. After this, try and drive for around 5 – 10 miles without using the brakes or as minimal as possible. If you have to come to a dead stop during these procedures, try not to sit with your foot on the brake, but use your parking brake OR let the car creep forward so that the brake pads do not get to sit on the same spot on the discs. This is a little hard with some car’s handbrake applying the rear brakes, so the creeping forward method is the best. This will help reduce the chance of any uneven deposits from the pads onto the discs. Once you have done your cool down drive, try and let your car sit for as long as you can. Performance compounds that are organic based will cure after this process and feel better when you next go to use them. We generally suggest doing this process in an evening so that you can let your car sit overnight. By doing this, it not only helps with your pads but also your new discs. New discs need to be put through a controlled heat cycle. So if you have just fitted new discs and not pads, this method is advised to do so that your new discs are not subjected to a big thermal shock if you just fit them with old pads and start using them at full strength.
You may feel the pedal go a little spongy, if it gets too soft abort the process and start again later. What is too soft? Too soft means that you feel that the brakes are not responding well. IF you feel the pedal starting to get softer and needing a bit more travel to apply the brakes, then only perform 1 more stop procedure (even if you have not yet reached your 6th stop) and then drive as mentioned about to let your brakes cool down.
SEMI-METALIC COMPOUNDS
The above method mentioned in STEP 2 works well, but then you can step things up a bit more and burnish your discs. Burnish is the actual correct term for doing performance brake pads, but we want to keep it separate from “bedding in” since it is best done with compounds that are designed to handle high temperatures. There are high performing organic compounds that can handle this, but we generally leave this method for the higher performing compounds such as semi-metalic. Burnishing is best done for maximum stopping performance, especially if you are looking to go on a track day. To do this, we will assume that you are running a high dry boiling point brake fluid. After you have completed and let your brakes fully cool down after STEP 2, perform 8 – 10 decelerations from 60-5mph with 90 – 100% pedal pressure with full acceleration between braking. The same driving without using your brakes afterwards to allow for cooling is recommended. After you have done this, you will see that your discs will have changed appearance from the nice transfer layer that has been applied from the pads.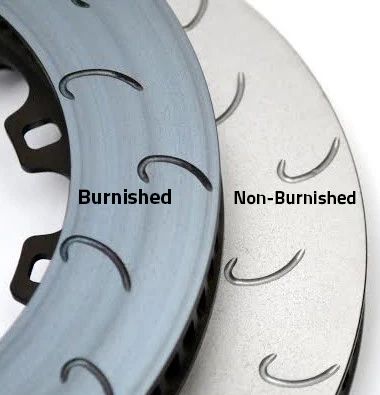
Under normal driving, the transfer layer from the pads will get worn away, but you can simply repeat the process to burnish your discs again whenever you want.
SINTERED RACE COMPOUNDS
These are motorsport compounds and just need pad seating to the disc with a mild heat cycle through them. Generally on track, 1-2 laps at a moderate pace and braking with a cool down after is all that is needed for these to be used under full race conditions. New discs need to be put through a controlled heat cycle. So if you have just fitted new discs and not pads, step 2 is advised to do so that your new discs are not subjected to a big thermal shock if you just fit them with old pads and start using them at full strength.